Deploy a Kubernetes Cluster on AWS, Step by Step
By Muhammad Soliman
This walkthrough sets up a working Kubernetes cluster on Amazon EKS in your own AWS account, then deploys an application to it with a DNS name and a TLS certificate. It follows the SeaGit product flow step by step: connect the AWS provider, create a network, provision the cluster, and deploy. It also says what the platform does not do, and what you should check before you rely on the result.
TL;DR
- You connect an AWS account once, through an IAM wizard. SeaGit then creates the network, the EKS cluster and the add-ons in that account.
- The getting-started guide estimates 15 to 20 minutes for the cluster step. Your run will vary with the AWS region and account state, so time your own run.
- The default ingress is ingress-nginx, which the Kubernetes project retired in March 2026 (what that means). On AWS you can instead choose the Envoy Gateway (Kubernetes Gateway API) option, which needs Kubernetes 1.33 or newer.
- AWS bills you directly for the control plane, nodes, NAT gateways and load balancers. SeaGit does not add infrastructure markup.
What you need before you start
- A SeaGit account with an organization.
- An AWS account where you can create IAM roles, a VPC and an EKS cluster.
- A container image or a GitHub repository with a Dockerfile, for the application step.
- A domain you control, if you want a custom hostname. You can use the default subdomain while you test.
- The AWS CLI and
kubectl, if you want to inspect the cluster from your terminal.
Why setting up EKS by hand takes so long
A working EKS cluster is more than a control plane. It needs a VPC with subnets in more than one availability zone, node groups with the right IAM roles, an OIDC provider for workload identity, an ingress controller that can get traffic into the cluster, DNS records, and certificates. Each piece has its own failure mode, and the order matters. Teams that build this by hand usually spend much of their first effort on networking and IAM, before the application runs at all.
The walkthrough below uses the product flow instead. It does not hide what is created. The clusters documentation lists the resources, and the rest of this guide points to the step that creates each one.
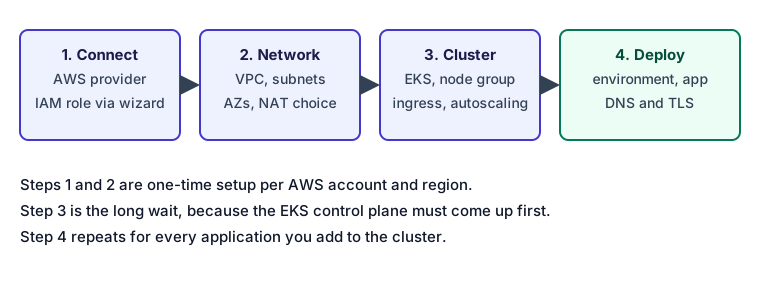 The four steps from a connected AWS account to a deployed application.
Step 1: Connect your AWS provider
Open Settings, then Providers, and choose AWS. The guided wizard asks you to grant SeaGit the IAM permissions it needs in your account. The getting-started guide describes the same flow and links the provider setup.
Check two things before you continue:
- The account and region are the ones you intend to use. A cluster created in the wrong region is hard to move later.
- Nothing in the account already uses the names you plan to reuse for the VPC or cluster.
This is a one-time step per account and region. You do not repeat it for each cluster.
Step 2: Create a network
Clusters are created inside a network. Create or choose one in the networks area, which the networks documentation describes. Check that the VPC has subnets in at least two availability zones. Decide how outbound traffic from private subnets reaches the internet. Each NAT option has a cost, so choose it deliberately rather than taking the default for a production setup.
Once the network exists, the cluster creation form lets you select it. A network you created for testing can be reused for evaluation, but keep production networks separate from test ones so that a cleanup never touches live traffic.
Step 3: Provision the cluster
Open Clusters, click New Cluster, and fill in the form. The fields that matter most are below.
- Network: the VPC from step 2.
- Kubernetes version: pick a current stable version. If you want the Gateway ingress option, the version must be 1.33 or newer.
- Node group instance type: a small general-purpose type is enough for evaluation. Move to a larger family for real workloads.
- Minimum and maximum nodes: the clusters documentation uses 2 and 10 as an example. The autoscaler adds and removes nodes within these bounds as pods request capacity.
- Ingress controller:
nginxis the default.gatewayis available on AWS for clusters at Kubernetes 1.33 or newer, and installs the Envoy Gateway. Because ingress-nginx no longer receives releases or security fixes, prefergatewayfor a new cluster when your Kubernetes version allows it.
Select Create. SeaGit provisions the EKS control plane, the managed node group, and the cluster add-ons. This is the longest step. The getting-started guide estimates 15 to 20 minutes, and the EKS control plane must come up before the nodes can join.
When the status shows the cluster as ready, the nodes should be visible from the terminal as described below.
If you have AWS CLI access with the same identity, you can connect your terminal to the cluster. The AWS documentation for creating a cluster describes the kubeconfig step. The command below is the standard EKS form, using a placeholder cluster name and region:
aws eks update-kubeconfig --region us-east-1 --name my-seagit-cluster
kubectl get nodes
kubectl get pods --all-namespaces
kubectl get nodes should list the nodes from the managed node group with a Ready status. If it returns an authorization error, your AWS identity is not mapped to the cluster, and no amount of retrying fixes that.
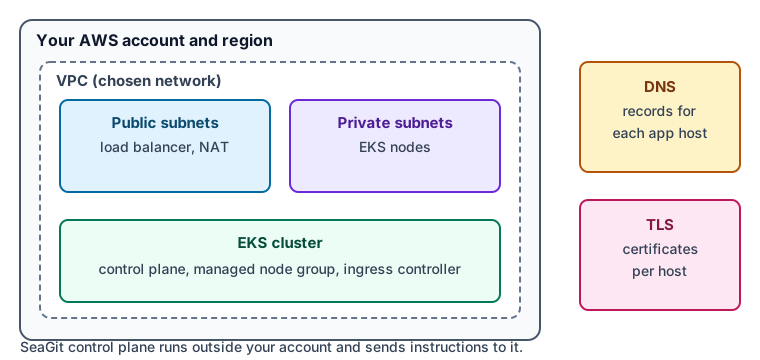 What the cluster creates in your AWS account. SeaGit's control plane sits outside the account.
Step 4: Deploy your first app
Create an Environment first, for example production, and link it to the cluster. Environments are where secrets, variables and deployment slots live. The environments documentation explains the model.
Then add an Application, point it at your image or repository, and set the port the app listens on. Open the application's instance, click Deploy, choose the target cluster, and select the version. The deployments documentation describes the three version sources:
| Source | What you enter | Example |
|---|---|---|
| Git | A branch, commit or tag | main, abc123, v1.2.3 |
| Container | An image tag | sha-abc123 |
| Helm chart | A chart version | 1.2.3 |
Select Deploy and watch the status. A deployment shows Deployed when the release is live on its URL. If it shows Deploy Error, read the deployment logs before you change anything, because the build can succeed while the rollout fails.
Verify the rollout from the cluster
The status badge is the platform's view. To confirm the workload from Kubernetes, use the namespace and deployment names shown on the deployment page:
kubectl get deployments --namespace <app-namespace>
kubectl rollout status deployment/<app-deployment> --namespace <app-namespace>
kubectl get ingress --namespace <app-namespace>
kubectl rollout status waits until the new ReplicaSet is available, which is the same behaviour the Kubernetes Deployment controller uses for rolling updates. The Kubernetes Deployment documentation describes the states it reports.
DNS and TLS for the app
When you attach a domain, SeaGit manages the DNS record and requests a certificate for the host. The DNS documentation and the certificates documentation list the providers and the steps for delegating a zone. The getting-started guide describes the certificate as a Let's Encrypt certificate that SeaGit provisions for the custom domain.
Before you tell users about the new URL, open it in a browser and check the certificate. Certificates depend on DNS resolving first, so a certificate that has not issued yet usually means the record is not in place.
How SeaGit handles this
SeaGit runs the cluster lifecycle from the control plane and keeps the resources in your AWS account. The points below are taken from the product documentation and the platform code.
- Ingress choice. The create form and the ingress code default to
nginx. Thegatewayoption is accepted only on AWS, and only at Kubernetes 1.33 or newer. The ingress migration guide covers moving an existing cluster. - Node groups. The clusters documentation describes on-demand and spot node groups and the cluster autoscaler. Spot nodes can be interrupted, so keep critical workloads on on-demand capacity.
- Deploy routes. A deployment from the UI or from a git push goes to the environment you choose. Automated git builds never write to the main deployment. They use a non-main slot, as described in the CI/CD routes page.
- Preview environments. Once the app is deployed, a push to a tracked branch can create a preview. See preview environments for the slot model.
Limits to know:
- The walkthrough uses AWS. The getting-started guide also mentions Azure and GCP. Check the provider page in your account for what is available to you.
- The Gateway ingress option is limited to AWS and Kubernetes 1.33 or newer.
- SeaGit does not replace your cloud bill. Plan node sizes and NAT gateways against your provider's pricing.
Common first-run issues
- The cluster stays in a creating state for a long time. Check the cluster events and the AWS console for the EKS status. A stuck state usually means the network or IAM permissions are not what the wizard expects.
kubectlreturns an authorization error. Your AWS identity is not mapped to the cluster. Use the identity that created the cluster, or ask the account owner to add yours.- The app deploys but the URL does not resolve. The DNS record may not exist yet, or the zone is not delegated. Check the DNS settings for the domain.
- The certificate is not issued. Confirm that the hostname resolves to the load balancer, then check the certificate status in the cluster.
What you get
A cluster you can inspect with standard tools. The workloads run in your account, so you can see the EC2 instances, load balancers and DNS records in the AWS console and in kubectl. The cluster is a standard EKS cluster in your account, so the AWS console and kubectl work on it directly.
Frequently asked questions
Do I need to know Kubernetes to use this?
For the setup steps, no. The product form covers the cluster and the deployment. For troubleshooting, you need basic kubectl skills, such as listing pods, reading events and checking a rollout.
How much does the cluster cost?
You pay AWS directly for the EKS control plane, the EC2 nodes, NAT gateways and load balancers. SeaGit does not add a markup on that infrastructure. SeaGit has a free plan, and the pricing page lists the paid plans.
Can I deploy to my own AWS account instead of a vendor's platform?
Yes. The cluster is created in the AWS account you connect. The bring your own cloud page describes the model.
Does it work with Azure and GCP too?
The getting-started guide mentions Azure and GCP. The ingress code path that offers Gateway API is limited to AWS. Check the provider page in your account before you plan a non-AWS deployment.
Sources
- Amazon EKS: Create an Amazon EKS cluster. The prerequisites, the kubeconfig step and the cluster creation flow.
- Kubernetes: Deployments. Rolling updates and the status the controller reports.
- Kubernetes: Ingress. The Ingress API is frozen, and the project recommends Gateway for new work.
- Helm: helm upgrade. Reference for release upgrades, if you deploy charts directly.
Checked October 2026.